Sunday, January 31, 2010

Keeping it real . . . a hiccup or two


Yes that is the tower to my computer. . . yes that is Barbie and her friends on the futon. . . Yes that is clothes and papers strewn everywhere. 

This last week or so has been a bit crazy for me.  I have been sick, had my father in law here and had my computer go kaput. . . we bought it a year ago and this isn't the first time we have sent it in.  I have a couple projects that I got done but I have been unable to upload them because of the above . . . yep a couple hiccups.

So here is one of the things I did . . . My husband asked me to build him a bag for his face shield . . .

So I traced around it, dug through my fabrics and came up with this . . .
It is actually made out of a fire resistant work coat that Dave didn't use or need any more.  (It didn't need to be fire resistant but it was a bunch of fabric that I wasn't going to use anytime soon.)
The main thing he needed was that it had a soft inner lining because the face shield could scratch easily and so I had some old velvet like curtains that I used as the lining.  The two greens don't match in any way, but it wasn't about the looks.  I also designed a cool pocket for the safety goggles. . .

It seemed to work for my husband and it can now sit in the back of his car and protect the face shield.

I also made a new cover for my pot handles but I will post that later.  Hopefully this week won't be so bad.  I have a couple things in the works and will be back to post them when they get done.  Of course I feel a bit out of whack without my main computer.  Thank goodness for the laptop and old computer we haven't given away.

Saturday, January 30, 2010

my LOVEly wall hanging....


I've been trying to come up with something to fill this wall ever since I took down my Christmas stuff....I finally found some inspiration on Moda Bake Shop...and this is what I came up with. I decided to just use squares because I want all of my wall hangings to have a similar feel to them.


LOVE how it turned out.


oh and with the left over scraps, I made these cute towels.....but now I can't use them, they are too cute. {such a dilemma to have}


Saturday, January 23, 2010

More LOVE blocks, a preview of things to come and an apology

This week I've been under the weather a bit. Nothing is getting done, not even crafts. I hope I feel better soon next week or in the next couple of days.
My craft group got together yesterday and even though I wasn't a hundred percent we got together and made some of those LOVE blocks I posted earlier this month. We had the option to put HOME on the back with colors to match your house, but alas I forgot to take pictures until almost everyone was gone. BUt I had to show you the one I took. Maybe I can get pictures from Liberty, or she will add them to this post so you can see others work. But here is one set that was SOOOOOO CUTE!! Love the purple.


Here is a little preview of something I am working on. As you can see it is in the planning stages and I am so excited about it. Hope it turns out as cute as it is in my head. I'll link you to some of the sites I found it on once it is done.


And the apology. I realized the other day that I have not responded to a single comment on my posts. I do appreciate them but unless they have a question I will probably not answer or respond to everyone. I hope that doesn't offend anyone but I have small children and the more time I spend on the computer the less time with them or making crafts, and that's what this blog is all about anyway. Hope you have a nice weekend and I am prayin' that I get over this head cold so I can get some crafting done { oh and that house cleaning too.}


Here are some pictures from me {Liberty} they turned out super cute.


Monday, January 18, 2010

Monogrammed Tote Bags

For Christmas this year I was really ambitious and made my nieces and nephews what we call church bags.  Something they can haul all their stuff to church and I don't have to (in my kids case.)  I found on the sight Crafting Chicks the idea of Monogrammed Tote bags.  They linked to another sight where they had a Tote bag Tutorial  One thing I find with tutorials is that they don't give the materials list up front.  So I thought since I wasn't going to give you the whole tutorial I might just tell you what I used to make my cute bags.

For the Girls totes you can use 2 or 3 different fabrics to make it coordinate together.

For the J tote:
  • Brown dot for the bag
  • Solid Pink for Pocket and Lining
  • Pink print for Letter, Ruffle and Handles


For the A tote:
  • Solid Black for bag
  • Hot pink for lining of bag and pocket
  • Black and white dot forLetter, Ruffle and Handles
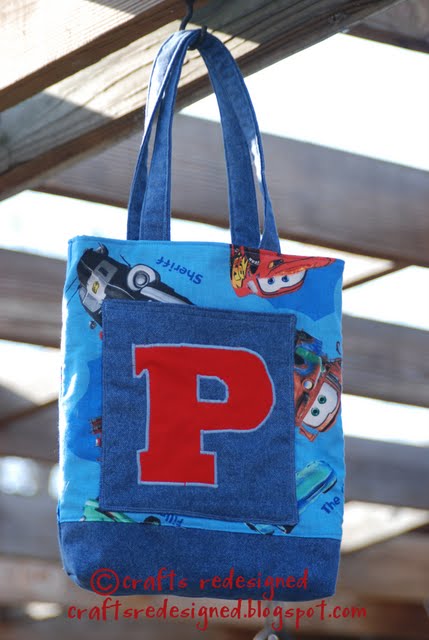


For the Boys tote:
  • Cars print for top half of the fabric

  • Blue denim like fabric for handles, pocket and lower portion of fabric


  • Red for Letter


  • Solid Blue for inner lining


The measurements for each of the bags are as follows.  I make them out of regular cotton fabric and to make the bags feel more substantial I always use flannel inbetween the inner and out bags.  So I will include how much of those I used also.  If you use a more substantial fabric like a home dec it may not require the extra layer. 

I attach the letters with wonder under or heat-n-bond to hold them to the fabric and then I sew the pocket pieces together before I do a decorative stitch around it so it goes through all layers.  Then I attach the pocket to the front fabric before I start putting the bag together.

MATERIALS LIST:
BAG:
Outer Fabric: cut 2 - 12 (width) inch by 13 (Height) inch
Lining Fabric: cut 2 - 12" x13"
Pocket: cut 2 - 8" x 9"
Handle: cut 2 - 4" x 22"
Ruffle: cut 1 - 2" x wof (width of fabric ~44 inches)
Letter: out of remaining scraps of material - I just used a font on my computer and printed it so it was about 6 inches tall.

FLANNEL LINING FABRIC:
Bag - cut 2 -12" x 13"
Pocket - Cut 1 - 8" x 9"
Handle - Cut 2 - 2" x 22"

FLOWERS (on Girls Tote): Tutorial here (I only made one layer with alternating fabrics)
I made my circles only 3 inches.  I made one circle for each color which makes two petals {6 total petals}.
About 2 inch strip of tulle gathered on the back .
Covered button or button of your choice.

BOYS TOTE:
For the outer bag I used about 10 inches of the CARS material and then 3 inches of the blue. 
You may have to make the pocket 8" x 8" to fit on without over lapping.

RUFFLE:
I finished the edges with my serger's hem stitch. Sewed the piece together to make a large circle. Then ran a couple of long stitches down the middle and gathered to fit the finished bag.  Then I sewed it on with a straight stitch.

I love that these totes are the perfect size for a coloring book and crayons or a notebook and pencils or 10 to 15 matchbox cars plus the froggy stuff animal or any variation of all of the above.  My kids love them and use them where ever they go.  I love that they don't take me too long to make and so I can make them for my kid's friends for birthday parties and throw in some new crayons and/or a coloring book.  I made a special coloring book for my nieces and nephews that was made from pictures.  I will include the HOW TO in the next couple of days.  It is the perfect gift for those little kiddos on my list.

The Girl Creative
Making

Wednesday, January 13, 2010

Valentine Door Wreath


Today I went upstairs to "clean" my craft room.  And then I saw my sad cork board and thought - "I want to put fabric on this and paint it up.  So I began scavenging through my fabric tote.  Next thing I know I am on the floor trying to figure out how to make a wreath I saw on Girl Creative.  It was so cute, but I wanted mine to be more full.  So I fiddled around with the hanger and some fabric.  I thought maybe extra fabric on the hanger before I started might make it fuller but then the fabric wouldn't slide.  Eventually I figured out that if I used a little wider fabric (then the ribbon she used) that it would make it fuller.  So then away I went.  {On the floor - because why would I clear off the table to do it.}
I cut my fabric strips about 1 to 1 1/2 inch by 6-8 inches long.  I used tulle and used about a 3 inch by 6 inch piece. 


Pink and white scraps of fabric


brown scraps of fabric
Basically once again all from scraps in my stash and a ribbon from a present from my daughter's birthday last week.
Here is an inbetween stage.  All you do is tie a single knot on to the wire hanger.  I turned my hanger around so the hook was in the top of the wreath.  I did have to do some twisting of the wire once I cut the hook off.

Then later that night I showed my friend Liberty and ta-da.  She made one too.


I think I like it better on a brown door. . . mmm should I paint my door to match. . . HEE!HEE!

I took probably less then an hour to make and it brightens up my door and Liberty's doors.  About the only time of year I can decorate with pink and not get weird looks from my hubby.  I'm liken' this Valentines decorating.  {Hopefully my house will get clean if I stay out of my craft room, but I wouldn't hold my breath on that one. hee,hee.}

Monday, January 11, 2010

A Tutu for my princess


My daughter loves to dress up and so for her birthday this year I found the perfect tutu on the Idea Room website by an amazing woman named Amy.  I mean how much better can that be then someone else with that great name.  Anyway  . . .  I found this to be soooo easy to make and probably made it in less then an hour.  I bought some of the precut spools but they were white and light pink and I could barely see the difference and so I bought some of the sparkly - HOT pink to add in from the bolt.  I had to cut these but with a rotary cutter and ruler it was real quick.  I also included ribbons - they would not hold as well as the tulle and so I tied them in a knot .  It has been her favorite thing.  I cut the pieces at 6 inches by 48 inches for my 5 year old.  They seem a bit long but she will only get taller as the years go by.  {We had a bit of the static cling issue the day I wanted to take pictures.  Oh, well.}


Thursday, January 7, 2010

A Mini Tutorial about LOVE

Sounds intriguing doesn't it.  I think it won't be as exciting as all that.  Today I opted to make this cute block L*O*V*E for my home instead of cleaning.  Liberty and I have been talking about making one and since I have almost NO Valentine decorations I thought it would be fun to make.  I have a husband who is a woodworker and has lots of scraps of wood and so while I was watching the kids out in the snow playing , I tinkered around in the "shop" and cut some wood.  I'm pretty proud of myself for figuring it all out.  {Dave has shown me a couple of times how to work the machine I used today.}  But I digress.  Here is a mini tutorial.  I am sure I have seen this done elsewhere on the internet but since I didn't see this specifically I made up a tutorial.

Materials:
  • 4 blocks of wood of various sizes
  • Acrylic Paint
  • Mod Podge
  • Sandpaper
  • Scrapbooking paper (small pieces are fine)
  • Embelishments {I used some silver tulle and my bling dots}
  • Vinyl letters (or you could maybe even use paper)

 Sand or prep your blocks before you paint.  Then paint them.  You don't have to paint the entire front.


 Next cut your papers to fit the blocks.  You may also want to cut out what else you may want on the front.


Next Mod Podge the papers on and then sand the edges.  Add what other fabric or ribbon that you may want in the background.


Add your Vinyl letters and any embellishments you may want. You may need glue or you can use the Mod Podge to keep things on.  Or glue dots or what ever suits your fancy.   I found these cute hearts and the bling in my stash.  Actually the whole thing was out of stuff I had.  It cost me nothing to make.  I love using what I have and making something waaaaay cute.

Hope that all makes sense.  I guess now I better get back to the house work - no playing tomorrow.  We have a big party on Saturday and the house has seen better days.  Have a nice day!!

Making
The Girl Creative

Monday, January 4, 2010

Two quick scarves


Here are my two cute kids being the reluctant models for their scarves I made. THESE are way easy to make. I mean can you sew in a straight line - 3 times in a row?? kind of easy. I was hoping my friend Liberty (who may also contribute here when she gets her computer/internet working again) had posted these on her website Liberty's Layouts but it looks like she hasn't had a chance. So since she hasn't, I can't link this to anyone's website because she is the one who gave me one (it's multi colored and soooo WAY CUTE) and I am not sure where she got the idea. BUT here it is, buy about 1/3 yard of fleece (12 inches or so). Then cut in half lengthwise (6 inches for each piece.) Then sew down the middle lengthwise and then next to that stitch about 1 inch on each side then clip (like you do when you make fringe on fleece blankets.) And wal-la about the fastest cute scarf you ever did make.


{did I make any sense? so the scarf should be 6 inches by the width of the material ~generally about 60 inches or so. You clip about every 1 inch.} I made these with scraps and I think they are about 5 or 6 inches by 30 or 40 inches - depending on the leftover material. Perfect for my little munchkins.

UPDATE:  Liberty has updated her blog to include the link she used to make the scarves.  Here the LINK to Liberty's blog.  Check it OUT!!


The Girl Creative

Friday, January 1, 2010

A Birthday Banner . . .

. . . . Seems appropriate for the birth of a new blog.  I have been him-hawing around trying to decide where to start.  This is kind of crazy but I wanted a place to show my creativity and the projects I have been working on.  My sewing group was sitting around and I was talking about creating a blog about my adventures in sewing, crafting and scrapbooking.  It just seemed natural to start a blog.  As we were talking I said but most of the ideas I do are already on the web . . . so why another one?  Basically I like to reDesign other peoples ideas and make them my own.  {Hence the blog name.}  I tweek them a bit and they come out marvelously.  I already have both a family blog and a Project 365 blog where I take a picture a day.  But I didn't want to bog those blogs down with my "creative" adventures.  I also wanted a place to just blab about how cool these ideas I find are and how I make them different then what you see.  If I do something that isn't out there on the web I'm sure I will be so excited about it and tell you. 

So about that Birthday banner I promised.  Well it isn't a new idea but it was a combination of See Mama Sew's Birthday Banner Tutorial and Kirsten's Creations Happy Birthday Garland Tutorial .  I have a girl and a boy and knew that the girl would want pink and purple but no way the boy would like that.  So I made it with both - I mean it's reversible. . .

GIRL SIDE


BOY SIDE

I made both the letters and the white pendants from felt.  {I wish I would have used black for the girl side letters but I can't change it now:(  }  The rest are just bits and pieces of fabric I had around the house.  The difference from the tutorials is that to get the pendants to look right on the front and the back I used a bit of Wonder under on the back of the triangles to secure them together before I sewed. (After the letters had been sewn on, that is.)  That helped it to not move when being sewn.

Anyway it was a lot of fun to make them and I know that Kirsten is pretty excited to use them for her party on Saturday.

Here are a couple close ups of the banner.


Making

LinkWithin

Related Posts with Thumbnails