Tuesday, August 31, 2010

Baby legs


Aren't these soooo cute?  These are one of the fastest and easiest things to make.  I think it took me all of 15 minutes to make them and probably included an interruption from my daughter or son.  I found a link from Homemade by Jill to a link on Flickr that is now not working.  It showed you how to make these adorable baby legs.  I hope the link comes back up so that others can make them.  If not, then maybe the next time I make some (and you know I will) I will create a tutorial so others can make them.  Really there is probably a hundred tutorials out there for them.  Maybe I will do a bit of research and add the links here I find.
Here is Little Birdie's Nest, she did it exactly how I did it.  It is soooo easy!!!  Here is another one I might have to try at Calico that makes it have a cute ruffled edge . . . mmmm. . . so many ideas and so little time.


PhotobucketJust as a teaser, I have figured out how to make this adorable onesie with a skirt.  I have all the pictures uploaded but now I have to create the tutorial and that takes a lot more time then it did to make it.

Monday, August 23, 2010

In full bloom...still...

I've seen these flowers and flower headbands EVERYWHERE in blogland...find a tutorial HERE, HERE, HERE and HERE. {and a million more if you want them}. I've been wanting to make me some, but I have had so much to catch up on....Saturday night I finally took a few hours and spent some time making some for me. {it was really fun, and super easy}. Most of them don't require ANY sewing {for those of you that keep telling me you can't sew}...so grab your hot glue gun, some cute fabric and make some for yourself. {and when you do, post them to our flickr group, we would love to see what you are making}.

I decided to combine the above tutorials and use velcro, so I only made 3 headbands...and LOTS of flowers that can be interchanged!


Here is my 365 picture from yesterday, so you can see how they look in my hair. {not quite as much like a 12 year old....maybe?}


Photobucket

Sunday, August 22, 2010

The Elastic Waist Skirt


I am so excited to post this skirt.  It was one of the easiest skirts I have ever made.  The Young Women in our church want to learn how to sew a skirt and have asked me and a handful of other people to help them to make these skirts.  So since I was going to be showing how to make it, I thought - perfect opportunity to make one for Kirsten.  Of course she is always happy to get a new skirt and especially if it is pink.  I used this same material that I made the artist smock from.  I saw one on Adventures in Dressmaking that actually lead me to the site Freshly Picked that has both a tuturial for a chld's skirt and the mama version.  I basically followed the directions with a couple of exceptions.  I did a rolled hem on the bottome edge, I gathered the skirt before adding it to the elastic and I added the cute ric rak because it was there and so dang cute.  I think I finished the whole thing - including cutting time in 45 minutes.  And that was with the thread changing and decisions on the ric rak. 
I used 2 inch wide elastic (20 inches) the size of Kirsten's waist plus an inch
11 inch by 45 inches for the skirt (length from waist to Kirsten's knee.)

Of course if you are going to make it you would measure your child and buy the fabric and elastic accordingly.  I found the elastic in the elastic section of JoAnn's and they have a 2 1/2 and 3 inch I believe, that would work better for a teanager or an adult.  I would guess based on Adventures in Dressmaking's measurements that 3/4 of a yard would work for most adults and possbily 1/2 yard for a teanager.  You would have to measure from your waist to the knee and find a measurement that is close.  I would probably add 1 to 2 inches for the gathering and the hem just to be safe.  You can always cut off if it is too long.
Since I wasn't crunched for time yesterday I made a bow.  I have been using the same bow instructions I found on Tip Junkie but this time I did a rolled serger hem and added the ric rak just for fun.  I use about 1 1/2 inches of fabric by the width of the fabric (about 45 inches) to make this kind of bow.


Photobucket


Making

Saturday, August 21, 2010

Child's Artist Smock


I have been in a crafting mood lately and have been making things for the last couple of days.  I realized on Thursday that I needed a smock (or old shirt) for Kirsten for Kindergarten.  I opted to make a cute artist smock.  I found it at Sew Mama Sew and thought it would be fun to make.  I had an old valance that I bought at the thrift store awhile back for less then a dollar that I pulled apart and used the material.  I think if I were to make it again I would use a little bit thicker material or double up, but hindsight is always 20/20.  Since Peter is starting Joy School with some friends and needed a smock of some sort.  I pulled out some material I had also bought at the same time for less then a dollar and made him one too.  It cost me more for the bias tape to go around each one.  The pattern is made from an old t-shirt as the base.  Sew Mama does a good job of teaching you how to make your own pattern and I think they turned out pretty cute.  Peter's is almost the same size and it seems to have more coverage.  I think I would make Kirsten's a little longer.  Now Kirsten will be the cutest girl in her Kindergarten class when they go to paint.  Now I just have to figure out how to put her name on it . . .

Did you notice we added a flicker slide show?  We just wanted to add some of the projects that we repeat over and over again and not bore you with pictures of yet another totebag or apron, etc.  Although I'm still thinking about adding my MONGO HUGE tote bag I made for going to the beach or the pool.  I will consider it if you are interested in knowing how to make it.
Photobucket

Tuesday, August 17, 2010

Crocheted baby blanket


I began this baby blanket when I was first pregnant.  I was put on modified bed rest and so I found myself often sitting around with nothing to do.  I like to do things with my hands while I am either watching TV or when I am outside watching my kids.  So began this project.  I hoped that I would get it done before the baby was born and last Friday I finished it.  It was a very simple pattern.  That is one of the qualifiers for crocheting for me.  I need a simple pattern that doesn't require me to count, keep track of where I am or have any major things that will be all mixed up when a child decides to distract me or I put it down for "just a minute" and return 3 weeks later. 
I found this wonderful website Lion Brand Yarn and used a pattern similar to this one.  It used only one Pound of Love Yarn ball.  It was an easy pattern and I loved the simplicity of the v-stitch.  I love this website because you can find all kinds of patterns that any skill level can do.  You just look for your skill level, crochet or knit and what you want to make.  They have tons of patterns.

Here are some close ups of the edges.

 I need a baby to show you the size.  Mine ended up being about 42 by 50 inches but I never pay attention to how many rows I am supposed to make.  I actually  ended up using a different yarn to finish the edge because of it.  It isn't noticeable but I guess it would help if I didn't try and just finish the ball of yarn I had and pay attention to how many rows I needed.
Photobucket

Tuesday, August 10, 2010

AND the winner is.....


The Morris Family....WAHOOO!!!!
{beware Amber and Karri are going to be mad at you!}

Make sure you email me with your current address!!! {I don't know if I have the right one!}

Photobucket

Wood Family Blocks Tutorial


What you will need:

  • 4x4 fence post cut in 3 1/2 inch lengths (or to make them like a cube)

  • 8 different pictures

  • 8-16 papers cut to3 1/2 x 3 1/2

  • mod podge

  • sand paper

  • vinyl letters or stickers or something to make the words with.

I have had these block finished for months.  I just kept forgetting to post about them.  Last fall we did a project using fence post blocks (4x4).  At that time I thought it might be fun to make the blocks as decoration for my home.  Then life happened and I got the blocks cut.

Then they sat in my craft room for awhile and I didn't get back to them.  Then I decided I wanted to work on them and so I had to figure out what pictures I was going to use.  I decided to go with Sepia tones.  I used Photoshop to make them into 3 1/2 x 3 1/2 size pictures and so they would have a similar look to them.
I sent them to Sam's club to be printed.  I left some extra parts of the pictures on the ones I wasn't absolutely sure where I would crop them.  Then I cropped them down to the 3 1/2 x 3 1/2 inch size with my paper trimmer.
Next I cut paper down to the same size.  For this project I needed 8 pictures and 16 cut pieces of paper.  I did duplicate quite a few but you have to make sure they don't end up on the same side when you glue it all together.

I rounded the corners on the pictures and the papers, then set aside what was going to go on each block.

I then just mod podged the papers on the sides of each block.  Remembering to put the pictures on opposite sides of each other and then making sure that the vinyl lettering I needed would show up on the papers.  Then sand the edges to the desired look.

I added the vinyl letters to the side to say HOME and LOVE.  My daughter loves to play with them and was more then willing to demonstrate the four sides that we did.
It does take a little thought process to make sure you end up with the pictures and papers on the right sides.  I did have to sand one of the pictures and a couple of the pages off since I spaced it and made it so there where two Kirsten's on the same side.  After I was finished I did another layer of mod podge to protect everything and here they are.
Photobucket

Saturday, August 7, 2010

I did it....and a giveaway!!!

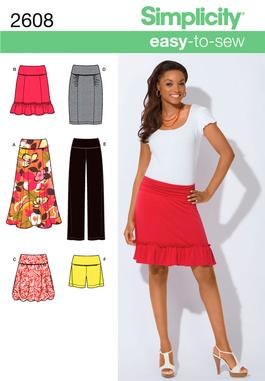
As I've said before, I just started sewing a little over a year ago....and I haven't been brave enough to make anything I can wear....BUT I got this baby for my birthday......and wanted to try a skirt. {I know it's not hard}.


I used this pattern....


...and in less than an hour....I had this CUTE skirt. {really, it was SO fast}. I did a rolled hem at the bottom and let it ruffle, it's so light. I love it!!!


so then I decided to make a pair of pants...I used an old table cloth I got at Salvation Army for $1 and cut it all up. They turned out ok....not as great as the skirt. Next time I will adjust the pattern a little bit, but that is why I was practicing on an old table cloth!!!! {don't you just love that hot pink?} I also did a rolled hem on the bottom and let them ruffle a little.


And because I was having SO much fun....I made this cute apron from a $2 panel I got at Hobby Lobby. It was so fast and easy and I am LOVING my new serger! I can't wait to come up with more projects to use it on!!!


AND....the GIVEAWAY.....

Like this cute apron? Leave us a comment and it could be yours. YEP, that's all you have to do, just leave a comment. I'll pick a random winner on Tuesday August 10th!

Happy Sewing!

Photobucket

Wednesday, August 4, 2010

Another bag? ! ? . . . . let's call it a purse


I finally made my own purse.  I bought the fabric months ago . . . I think I bought it back in February.  It is the same fabric I used on my Spring Wall Hanging .  I fell in love with it and decided I was going to make a bag for myself.  Then life happened . . . 1st trimester sluggishness . . . birthday presents to make . . . other projects to make . . . LIFE.   I also wanted to wait until Liberty had figured out all the bugs in the pattern we had been using.  The bag turned out marvelous.  I used Liberty's hand bag tutorial as the basis for what I made.  I made the bag 20 inches wide (it is huge - but I'm going to need it with a baby on the way) and each of the pieces to make the front of the bag is 8 inches tall.  I decided also to conquer my fear of zippers and try a zipper pocket. 

I looked online and found a bunch of different tutorials.  But this is the one I found to be the easiest at Sew Mama Sew.  I took the old zipper out of my purse that was dying and put it in here (that is why it is pink).  I was quite impressed with how easy it was and quickly it came together.  I LOVE having it in my purse.  I always hate not having a zippered pocket for those things we like to hide.  Of course I made a million other pockets for things I don't really want to have floating around the bottom of my purse.

After I got done making this I decided to make a gathered clutch.  I used the tutorial on Noodlehead to make a matching clutch.  I made it really simple and instead of making the cardholder and divider I just added a simple one card pocket.  I'm not going to use it for a wallet, just to hold items that I don't want wandering around the bottom of my bag.  Like JoAnn's, Hobby Lobby and Kohl's coupons.

I still have some left over fabric . . . ummmm . . . what can I make????  A key fob, a matching diaper holder, a cover for my calendar. . . . the possibilities are endless.  But is that a bit to much matchy-matchy???

Photobucket
Visit thecsiproject.com

Monday, August 2, 2010

Summer dress fix


So I bought these two dresses at Kohl's on their clearance rack for $10 each.  I knew they might be a little short once I washed them.  They are cotton knit and I loved the style.  I actually bought another shirt that has the same elastic gathering in the middle.  One washing and they started running a little short.  I saw on Make it and Love it where she added on a ruffle and I thought.  I can do that.  So went to the store and bought material to add to both.  So far I have only got the green one done but I have the material to make the other.


I added a 6 inch ruffle on the bottom.


And a little piece at the top to keep things from showing on the top. 

I love this dress.  It is my best GO TO dress for summer.  It is so comfy and anything that doesn't bind around my ever growing tummy is wonderful.  I think I spent maybe $2 or 3 on the additional fabric and with my serger I added this really quick.  I just need to switch the thread on my serger to white and then I can finish the orange one before the summer is over.

Before (pretend it is green)

After
Photobucket

LinkWithin

Related Posts with Thumbnails