Sunday, August 7, 2011

RACE CAR Birthday Party

 About a month ago Peter said he wanted a race car birthday cake.  So, I decided to oblige.  I then decided that we were going to do the whole thing race car themed.  While walking through JoAnn's I happened upon some black and white checkered felt.  Peter was with me and he thought it was the coolest fabric and I agreed.  He carried that fabric around the store until we got it cut.  I had no idea what I was going to do with it or how much to get and so I bought 2 yards.  It was $5.99/ yard and I had a 40% off coupon.  It was only 30 inches wide which really wasn't a problem when I worked with it. 

So here we go.  The invitation.


This was designed by me with the kits Busy Roads and The World is Moving by Kitty Designs (found at Oscraps.com)  I got my ideas for the wording from different sites.  I don't exactly remember where.  I just put in race car birthday party ideas and this is probably a combination of a couple ideas.  I had them printed at Sam's. 

Next I discussed with Peter what he wanted to do for his cake - circle or rectangle shape.  With a round track or oval.  Then after I got a general idea of what he wanted along with some help from his sister we were off.  Trying to figure out how to make a black track.  I went to JoAnn's again and found in the Wilton area some black sugar paper.  It was perfect for what we needed.  I ended up again using my 40% off coupon and actually ended up going back and buying a 2nd one.  I wanted to make a checkered flag to go around the sides.  Anyway here is the cake and a few extra pictures so you can get an idea of what I did.


The grandstands were an idea I found when looking at race car cakes.  I wish I could send you to the link but all they are is frosting covered cardstock with sprinkles.  I thought it was such a cute idea and had to incorporate it in.


The border is M&M's, I let the kids put them on and they loved doing that.  I did put a little "flower" border so they would have somewhere to stick them.


The center is just green tinted frosting made to look like the center field of most race tracks.


Lastly, one of my favorite parts - the checkered flag sides.  I cut the sugar paper with my ruler and the pizza cutter.  It made it easy.  Then I frosted small sections and added the black squares.

The entire cake is frosted with buttercream frosting.  I found my recipe here at I am a Baker (it is at the way bottom after the cake.)

I used a recipe that I found a couple of years ago for the best chocolate cake - and I really think it is.  I think most of the kids gobbled up their pieces.  Of course I cut really small pieces, since I know most kids just waste the cake at this age.

Next we had to have race cars.  I found this idea at How Does She?  I loved the idea of race cars made from cardboard boxes.  I think they turned out pretty cute.


I invited 4 boys and Peter  and so I decided to make 5cars.  They were way easy to make and I had everything except the paint.  I made the car numbers similar to race cars in Nascar, although I only had 3 cans of paint and so I had to make some of the cars different then the original cars.  I made one with the #4 since Peter was turning 4.  They were fun to make.

Since I knew that the kids would probably only race for a little while I thought I better come up with something else.  Off to the garage I went and found a long piece of wood about 4 feet by 1 1/2 feet.  I found a couple of smaller pieces that were about one inch square by 3 1/2 feet.  I hooked them to the edge and we were able to have matchbox car races on that.  If the wood hadn't been something we need for shelves I would have probably have nailed the sides down instead of clamping.  Either way the kids didn't really care.  At times I saw cars and trucks bigger then the match box size going down.  The kids thought that was pretty cool.


Out of the checkered fabric I made a checkered flag for the races. 


I also made mini checkered flags to go in the goodie bags.  Instead of $1 store items in the bags I bought a matchbox car for each, a big play-doh, a fruit snack and a handful of starbursts.  I would have taken a picture but I didn't really think about it.

I cut the fabric into squares to put under the cake and on the table for the gifts.  Then I took the remaining fabric and made a checkered flag banner or bunting.  I think it turned out pretty good.  I used a grosgrain ribbon to sew it onto. 


Here is the cute birthday boy showing off the bunting. 

I also bought a pack of cones to mark off the race.  If it hadn't been 100+ heat index the day of the party we would have been able to go outside and do the races.  With it so hot outside we ended up doing the races around my kitchen living room "track".  Since we didn't get a chance to race outside I was glad I had set the Cars movie to watch the final race.  It seemed fitting to end the fun with a "real" race.

Happy 4th Birthday to my dear sweet boy!!


 Photobucket

Saturday, August 6, 2011

Ruffled Notebook Cover Tutorial

Maybe you remember back in  February I made a Ruffled Notebook Cover ?!?!?!  It looked like this.


Oh yeah you say. . . I seem to remember you promising a tutorial . . . Yep, I had more to make and thought I would get to it soon.  Now it is 6 months later and I am getting around to it.  It might look like I was waiting for the notebooks to go on sale, but that would just be me trying to get around the fact that my craft room has been collecting dust for the most part.  Something about a VERY mobile baby and other projects getting in the way.

With all that said I finally finished up the other notebooks I had cut out and so I have no excuse for not getting this posted now.  Here they are in all their beauty!!!


Now for the tutorial.  Drum roll please.  Okay maybe not that much fanfare.  I must put a funny side note on this tutorial - In my haste to finish the one for Liberty earlier this year, I forgot to finish taking pictures and so as you go through the pictures you will notice the fabric changes in most the pictures.  My mistake.  I am kind of spacey most days.
Another side note:  I tend to explain things expecting you to know basic construction techniques.  I am not very detailed, sorry.  If you have questions then email me or leave a comment and I will respond to you.

Materials:
  • Composition notebook (good to buy them now when they are under a $1 at some places - they can be over $3 off school season.)
  • Main Fabric about 1/2 yard
  • Coordinating fabric for ruffle and pocket - 1/4 to 1/3 yard
  • Ribbon about 1 yard
Fabric Cutting:

Main fabric: CUT two of each size
  • 16 1/2 inch by 4 inch (outside top and bottom)
  • 8 inch by 11 inch (inside panel)
Coordinating fabric: CUT one of each size
  • 40 inch by 5 inch (ruffle)
  • 6 inch by 6 inch (pocket)
Ribbon: CUT two of each
  • 12 or 13 inch pieces  for ties
  • 4 inch pieces for "binding"
How To:
Begin by taking ruffle piece and doing two rows of gathering stitches on both sides of the fabric.


Next attach ruffle to one of the main front fabrics, matching edges and then middles.


Then pull the threads to gather the material to the top fabric piece.  Then sew along this edge.  It will look like you are making a skirt for a minute now.


Repeat with the bottom piece of fabric.


Next step is to press the piece so the ruffles look more flat.  I tend to pull the top and bottom pieces a little bit as I press.  I also press where the ruffles meet the top pieces towards the non ruffled piece.   It will make it easier to pull the ruffles better and also makes a place where we can top stitch.


Next topstitch about 1/8 to 1/4 inch from the ruffles.


Now pull out your pocket piece and press about 1/2 inch down on one side.  You should probably finish the edge with serging, zigzag or cut with pinking sheers first.  Once you have pressed it down you can stitch down the top of the pocket.  I ran two stitches along the edge of where I had folded.


Now fold in all the edges about 1/2 inch and press with iron.  Then hold on to this while we get the inside panels ready.


Take the inside panels and on the 11inch side finish the edge then fold over about 1/2 inch, press and stitch.  Repeat for other  piece.


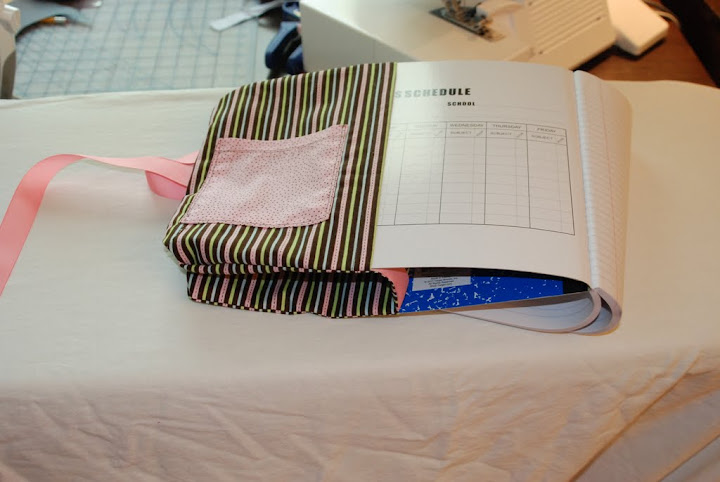
Flip to the right side and pin the pocket on.  I kind of center it top to bottom but put it closer to the sewn edge and then do a double row of stitches like I did on the top.


Here is a close up of what I mean.


Now we are ready to assemble our cover.  Place inside panels with hemmed (sewn) edges in the middle and match sides and top together.  There should be a gap between them.


Cut the ribbons to about 12 or 13 inches. Then pin them in where the seam on the outer edge. Make sure you place the ribbon in the center of the outer side seams. I try and match up the ribbons from the front to back so that they will match when you close the book.

Next take your note book. ( I try and make sure it is the one I am going to use for the end product in case they are a different size. )  I fold the fabric around it and find the center.  Then open up the fabric and place the book on the one side.  I take a pen and trace around the notebook - being generous with the lines.  I carefully put the notebook on the other side and then repeat process.


Here is what I mean.  (A closer view.)


Place the 4 inch piece of ribbon across the gap.  I did this part wrong in this picture.  The next picture shows how they should be.  I put the ribbon across the gap and on the "line" that I have drawn before.  Then you stitch around the entire thing starting and ending near one of the ribbons across the gap.


Now come the hard part.  Before you clip or cut anything it is time to try it on.  This is where I always cringe.  Did I measure it right, did I sew it right.  Make sure you have your friend the seam ripper near by.  It is likely you will need it.

Here is the way I have to put it on.  It always makes me cringe. 


Anyway - once it fits you have one pretty simple step.  I finish my edges by cutting them with the pinking shears.  It makes it really nice when you go around the corners.  You don't have to clip or cut the corners and it gives it a finish that won't unravel.  I am careful to move my ribbon as I cut the fabric underneath.  (see photo where I attached the ribbon above.)


(this has the ribbon wrong, although when I did this I didn't pick it out and it works, just adds a little bit of bulk in the spine area.)

Then you are done, you can go now and write notes in style.  I think these might be fun for a high school or college age kid.  I did give Kirsten one for helping me with cleaning up before Peter's party.  She was a real trooper and I always feel sorry for the kid that doesn't get anything new.


These are fun to make but require a little bit of time to make them look nice.  Always press when possible.  I might suggest not using the stripes. It made it pretty obvious when my center ruffle wasn't exactly straight.  But Kirsten didn't even notice.  I didn't add the pencil/pen holder because I don't like mine and haven't been able to figure out a good method.  I think with Liberty's and others I have just added a looped ribbon piece above where you add the ribbon for the ties.  Just make sure that the ribbon will hold your pencil and is on the back part rather then the front near the pocket.  I have added it after I get all done too, just unpick the area you want it and slip it in and then re sew the area.

I am pretty excited to get these done and now I can work on a new project.  Hope you like it.  Please email me with any questions or comment below.


 Photobucket

Sunday, July 17, 2011

Happy Belated 4th of July Table Runner

Between Liberty and I we are racking up those sky miles - or a least we would if we could.  It has been a crazy month for both of us and I really wanted to post this before we left for our vacation to Utah.  But of course packing and getting other things ready became more of a priority.  So for those of you who celebrate July 24th in Utah - Here is a way fun table runner that I made for our family auction in Utah.  My sister in law was so excited and even more so that she could still use it for the 24th.

I found the idea at V and Co from Amy of Diary of a Quilter over a year ago.  She did this beautiful table runner and last summer I wanted to make one of these and cut everything out and then . . . NOTHING.  I was digging through my fabrics last month and found this all ready to go.  I knew I needed something for the family auction and thought - this won't take me more then an hour.  BINGO.  Really easy once you get started.  All the instructions are there and it is really user friendly.  I decided to use the cool metallic thread I just acquired and this is a closer view of the stitching.


That one is a bit blurry but here is another one just so you can see how cute it turned out.


Thanks for stopping by.  Hope I can get a couple more things that I have finished in the last little while on here.  We will see.  I'm not promising anything.  Life is a bit crazy with an on the go 9 month old, a very active almost 4 year old and their older sister.  But that is how life is, isn't it.

Have a nice day!


  Photobucket

Monday, June 20, 2011

Pioneer Aprons...

I spend the weekend in Nauvoo, IL. We had a youth conference with 200 adults and youth. It was AMAZING! I made these aprons for the Stake YW Presidency. They all LOVED them and wore them almost the entire time. {I am working on a tutorial for them, but I've had no sleep in 5 days so I will wait until I am more with it so you can understand the instructions!}

UPDATED: TUTORIAL FINALLY AVAILABLE HERE!!!!!!


They are pretty easy, I used overalls that I got at the thrift store and strips of fabric that I surged the edges and didn't even hem....I promise to get all the measurements and instructions soon!

Photobucket

Tuesday, May 31, 2011

Skirt OBSESSED...

I think I might be a little skirt obsessed...but these are SO SO easy and SO comfy...I used this pattern HERE.


I added some trim on the bottom of this one and then pleated a few horizontal pleats. I LOVE how it turned out.


I even made me a pioneer skirt to wear at youth conference in a few weeks. I added a pleated ruffle at the bottom. It goes all the way to the floor, I can't wait to wear it in Nauvoo.


Photobucket

Sunday, May 15, 2011

Angry birds fun

Have you played the game yet?  My kids sure have. 


We were looking at some ideas I had for a possible birthday present for one of Kirsten's friends. But she had other ideas. She wanted to go shopping for her friend. So as we were looking Kirsten saw my link to Angry Birds Tutorial and wanted one. I was in a crafting/sewing lull and so it was a nice way to break up the almost non-existent crafting lately.

These are super cute and super easy. I didn't exactly follow the directions. BUT DO I EVER? Instead of making the eyes the way she suggested I just cut them out and sewed them on. I guess I had the chance they might not look right but the kids really didn't care. I think they turned out pretty cute.

Then when we had them both done, Kirsten started ordering the rest of the crew. I was using what fleece I had on hand and so there are no pigs (don't have green) and the rest are not made yet because the kids haven't really asked me for them.

Here are a couple more pictures.  I just thought the kids were cute playing with them.


 Photobucket

Sunday, May 1, 2011

Easter dresses

I don't know if people are still even looking at this blog, but we are still around.  We just have been overly busy or just too crazy in our life to actually publish things on the web.  I had been working on Easter dresses for the girls.  I used a pattern for the top and the sleeves and then adapted as I went.  It took me longer because I was making it up as I went along.  Esther has a different dress that I was copying the ruffle of the skirt with.  I found the lace that I had bought at a garage sale and found that I could use it on the dresses.  It was an adventure to say the least.  Here are the pictures I took of the two of them. 


Hope you had a Happy Easter.  Here is a project that I finished a couple of days before Easter.  Liberty found these letters after last Easter on clearance for $2 or 3.  I bought the paper at JoAnn's.  The sparkly kind is hard to put on the wood because it is very stiff.   I decorated it with odds and ends around the house.


 Photobucket

LinkWithin

Related Posts with Thumbnails