Saturday, November 19, 2011

Family Wood blocks


So I have had these blocks for a long time.  If I had realized I didn't have a before picture then I would have taken one of them.  But think "toll" painting.  Mainly each letter a different color in a blue, brown, burgundy pattern (ABC for those with primary grade kids) and splattered with black and white paint.  Really cute but they didn't match my decor and I was "tired" of the look.  Then while I was in Utah over the summer I saw that my sister-in-law had painted hers all black.  It looked awesome and matched her frames so great.  I decided that I was going to do that when I got home. 

Well almost 5 months after we got home and I finally got around to it.  I decided after making my Be Thankful sign last month that I LOVED the pattern and coloring of the paper.  I ran back to Micheals and bought more so I could mod podge the paper on my family blocks.  I sanded the old paint off and painted the sides black.  Mod podged the paper on and then did a little smudge on the sides of the letters to make it look a little messy.  I LOVE, LOVE, LOVE how they turned out.  It only took me a little bit of time and it looks awesome.  It is even better that I didn't have to touch the heart.  It matched perfectly and give it a nice look.  It also matches my frames - they are black and burgundy.

Sorry about the glare on the pictures, I tried not to but the reflection just happened in all my pictures.  Plus it was finally a nice day with sunshine since this room doesn't get much "good" light for taking pictures.
Photobucket

Saturday, November 12, 2011

A nursing cover with a twist

One of my friends called me the other day just before her baby was born and asked me for what she would need for a nursing cover.  As we talked I realized that her baby was going to be born in the next couple of days and that in reality she would probably get it done just before he turned 1.  Okay maybe I would have got it done if I were her by the time my baby was one.  So I offered to make it for her, especially since I hadn't started something for her yet.  I used the tutorial from Sew Much Ado for the instructions on how to make it.  

I bought the fabric at Hobby Lobby and decided since it was a little thin that I might need to make it double thickness.  I really thought it would be fun to bring some of the pattern on to the front and so I decided that I would do that.  I guess I could have just cut strips of fabric and done it that way but I decided that I wanted to try one of those self-binding blanket tutorials on it.  I was a bit nervous since I had never done it before and instead of a square like most blankets this was going to be a rectangle.

Here is the tutorial I found for the Self-binding blanket.  My measurements were:
Main fabric: 25 inches by 35 inches
Coordinating/Back fabric: 35 inches by 45 inches

I pretty much followed the tutorial at Self-binding blanket to the point where you are ready to sew around the "binding".  Before I did that I sewed the boning into the top portion and added the
straps to the top.  I closed it up by sewing around like the tutoral for the blanket says.  It ended up pretty cute.  I had enough fabric left over to make diaper and wipes container holder.  I hope she enjoys it.

Here is a second picture to show you it a little closer.  (I tried to model it but I didn't have a baby to put under and my photographer was only 4 years old.


Photobucket

Saturday, October 29, 2011

Mummy Jars

Have you been on Pinterest?

If you need an invite, let me know. {but I'm going to warn you that it's VERY addictive!!!}
If you had been there, you would see that there are 100's of Mummy Jar Ideas. I LOVE them.


 My friend MaryRuth made some and emailed me a picture a few days ago and I HAD to make some before Halloween was here. They are SOOOO easy!!!! {I made two sets of these in less than 30 minutes and for about $2}. I got the LED battery candles. {in the Christmas section at Walmart}


Take old canning jars {or pickle jars, or baby food jars, the possibilities are endless}
get sterile medical gauze that you can buy at walmart (in the pharmacy section)
and then you paint modge podge
all over the bottle
start at the bottom
and start wrapping
you'll need to put
modge podge between the layers of gauze
you only do one layer of gauze
but slightly overlap each layer
and then when its all how you like it
you paint a layer of modge podge on top of the whole thing really quick
and then glue on googly eyes {I like the big ones on the big bottles} with even more modge podged. {or E6000}
that's it.

I stretched and frayed my gauze a little to make it a little more messy. Then add candles. Tea lights or battery LED ones. SOOOOO cute!!! and SO easy to make! Go ahead make 100 of them.


Photobucket

Monday, October 10, 2011

Card Night for Craft Group

Welcome Woodridge 1st Ward Craft Group. We want to have one place online where we can post all of our craft group pictures and projects. We will be posting ALL of our projects here and will give you all the details for each craft group here {so you might want to bookmark it!}.

We are excited to announce our next Craft night will be making homemade cards. It will be FRIDAY NOVEMBER 11th at 7pm at the Woodridge Church building. There will be NO COST for this craft, however you will need to bring your own supplies. We WILL PROVIDE all the stamps, ink and tools. We will also have SOME scrap paper that you can use, but if you want something specific, please bring your own.

You will need to bring:

A TRIMMER {if you have one} will will have a few to share
ADHESIVE {NOT glue, scrapbook adhesive tape, you can get it at Hobby Lobby, Joann's or Michael's}
SCRAP PAPER {we will some}
EMBELLISHMENTS {buttons, brads, ribbon, etc.}
CARD BACKS {you can buy them at the same places and they come in different quantities so you might want to share a pack with someone else who is coming}
ENVELOPES {usually come in the pack with the card backs}


We will mostly be working on Christmas/Holiday cards and Meagan has made some samples for you to "copy" {Thanks Meagan for helping us with this fun night!} If you don't want holiday cards you are welcome to work on ANY cards you want. {thank you, birthday, baby, congrats, etc.}


Come play with us and make some pretty cards. You can make 1 or 100. You can make a "whole set" and tie them up with a pretty bow for a gift to give anybody {mom, grandma, school teachers, bus driver, etc.}. Everyone uses cards and homemade ones make a GREAT gift.

These are cards from the last craft group
If you have any questions, please leave us a comment. ALSO, please comment and let us know if you are planning to come so we can set up enough room for everyone.


Photobucket Photobucket

Tuesday, October 4, 2011

Forget Not....

Did you hear President Uchtdorf's talk on Saturday night at the General RS Broadcast? It was AMAZING. I loved everything about it, but most especially I felt like he was talking directly to me. I felt like it was direct from heaven and that I was the most important person there. I am sure anyone who hears it will feel the same. It was SO good. {I can't way enough good about it.} You can watch and/or listen to it HERE. As soon as we came home I started seeing printables of the tiny forget me not flowers and decided that I wanted to make my own. {you can download them at the bottom of this post!}

I had some free canvas and I wanted to try it on the canvas to see how it would look. I LOVE it. It's exactly what I was hoping for. I printed my image 8x10 and then trimmed the sides down just a little bit so it fit on my 8x10 canvas. I then modge podged it onto the canvas. Be careful to not scrape the picture or it will scrape off the processing of the picture. I love how they turned out....no, they are not as cool as canvas...but they probably cost about $10 or less {if you had to buy the canvas}.


After the modge podge was dry, I painted the edges of the canvas a charcoal gray and blended it on the edges of the photo so it would hide the edge of the photo and look like it was inked on the edges.

 I then got carried away and made a 16x20 of the Salt Lake Temple. I did the same thing with this one, it was a little harder to keep the picture glued down on the canvas because my picture was rolled up when I picked it up from the photo place. Make sure you have a flat photo for easier results.


Here is a close up view of the edges.


Here is the download if you want to print your own "Forget Not" sign.

8x10 PRINT SIZE - Click twice to enlarge and then right click and "save as" to get image
4x6 PRINT SIZE - Click twice to enlarge and then right click and "save as" to get image
    Photobucket

Saturday, October 1, 2011

Reversible Fall Wood signs

Here are some samples of from our latest craft group.  After everyone was done, Liberty and I finished up ours.  I think they are pretty cute.  I have a window in my kitchen that opens to the family room below and so instead of making mine reversible with Halloween on one side and thanksgiving on the other, I just did one for each holiday.  They are so cool.  My favorite I think is the be thankful and I have decided that I might use the paper on the Family Letters I have on my mantel.


We had a great time with everyone and they all turned out so cute. I love working on projects together so we can all get ideas from each other. Thanks ladies for making it so much fun.


Photobucket Photobucket

Monday, September 12, 2011

Easy Peasy Cards

So this weekend I was doing this instead of the many things that I need to be doing. I have needed thank you notes and birthday cards that weren't so girly. So Saturday I cut out 5 different colored stars and the craft brown paper backing with my Cricut and away I went. I think Liberty told me about this idea although I don't know if I ever saw the ones she did. These are simple and basic and didn't take all that long. I stamped the sentiment before hand just so I would have room for it. All I did, after I made them all look grungy with the stamp pad, was hold the stars on as I sewed across them. Since I was doing this assembly line style I just had everything next to me and ran them in one after the other. Here is a close up of the sewing. ( I came back and made an X on them for the second pass.)


I think it took me more time to pull the threads back in and tape them to the back.

I made these in a 3 1/2 x 5 inch card with the fronts only being 3 x 4 3/4, but they could be made for larger. I just have a million little envelopes from who knows where.

Just a bit of housekeeping for this site now. Liberty and I are at the point where we aren't going to be posting all the time. Mainly just when the mood suits us. We are at that part of life where it gets too busy and we have to let something go. I'm not saying we are never going to blog but we just aren't going to feel guilty about not doing it. Life is crazy that way. Hope you understand. We will probably use the blog as a filing place for our projects we make.


Photobucket

Saturday, August 20, 2011

Ruching + Pillowcase Dress = CUTE

I always hate to toot my own horn, but this time I think I came up with a pretty good idea.  Not sure if I have seen it around the web.  Actually didn't look for it, just came up with it on my own after I made the ruffled notebook covers.  Or maybe the other way around.  I can't remember.  I have been dying to get these up on our blog but just have not got the pictures done.  These were actually made before the Easter dresses I made.  I know - what a slacker I am.  I finally took the kids out and took pictures of them.  I don't think you can see the ruching in Esther's dress but as you see in the following pictures, I made a white ruching section.  I divided the dress into thirds and made the bottom a solid blue.  The white is 3 or 4 inches of a white on white print and then the top is a red star material. 


A better look at the whole dress on Kirsten.


Now you can see both the ruching and the ruffle bottoms I made for Esther. 


Here is a little bit closer look on the bigger dress.  One thing I didn't like about the ruching is it kind of puffed out.  Maybe if I put a solid piece behind it there would be less puffing?   I don't know.  It still looks cute.


Although I'm not really sold on the pillowcase dresses.  They are cute but just hang on my little skinny girls.  I like a more fitted dress on them.  Maybe next time (if there is a next time) I will do a gather in the center to make it more fitted on them.

Photobucket

Sunday, August 7, 2011

RACE CAR Birthday Party

 About a month ago Peter said he wanted a race car birthday cake.  So, I decided to oblige.  I then decided that we were going to do the whole thing race car themed.  While walking through JoAnn's I happened upon some black and white checkered felt.  Peter was with me and he thought it was the coolest fabric and I agreed.  He carried that fabric around the store until we got it cut.  I had no idea what I was going to do with it or how much to get and so I bought 2 yards.  It was $5.99/ yard and I had a 40% off coupon.  It was only 30 inches wide which really wasn't a problem when I worked with it. 

So here we go.  The invitation.


This was designed by me with the kits Busy Roads and The World is Moving by Kitty Designs (found at Oscraps.com)  I got my ideas for the wording from different sites.  I don't exactly remember where.  I just put in race car birthday party ideas and this is probably a combination of a couple ideas.  I had them printed at Sam's. 

Next I discussed with Peter what he wanted to do for his cake - circle or rectangle shape.  With a round track or oval.  Then after I got a general idea of what he wanted along with some help from his sister we were off.  Trying to figure out how to make a black track.  I went to JoAnn's again and found in the Wilton area some black sugar paper.  It was perfect for what we needed.  I ended up again using my 40% off coupon and actually ended up going back and buying a 2nd one.  I wanted to make a checkered flag to go around the sides.  Anyway here is the cake and a few extra pictures so you can get an idea of what I did.


The grandstands were an idea I found when looking at race car cakes.  I wish I could send you to the link but all they are is frosting covered cardstock with sprinkles.  I thought it was such a cute idea and had to incorporate it in.


The border is M&M's, I let the kids put them on and they loved doing that.  I did put a little "flower" border so they would have somewhere to stick them.


The center is just green tinted frosting made to look like the center field of most race tracks.


Lastly, one of my favorite parts - the checkered flag sides.  I cut the sugar paper with my ruler and the pizza cutter.  It made it easy.  Then I frosted small sections and added the black squares.

The entire cake is frosted with buttercream frosting.  I found my recipe here at I am a Baker (it is at the way bottom after the cake.)

I used a recipe that I found a couple of years ago for the best chocolate cake - and I really think it is.  I think most of the kids gobbled up their pieces.  Of course I cut really small pieces, since I know most kids just waste the cake at this age.

Next we had to have race cars.  I found this idea at How Does She?  I loved the idea of race cars made from cardboard boxes.  I think they turned out pretty cute.


I invited 4 boys and Peter  and so I decided to make 5cars.  They were way easy to make and I had everything except the paint.  I made the car numbers similar to race cars in Nascar, although I only had 3 cans of paint and so I had to make some of the cars different then the original cars.  I made one with the #4 since Peter was turning 4.  They were fun to make.

Since I knew that the kids would probably only race for a little while I thought I better come up with something else.  Off to the garage I went and found a long piece of wood about 4 feet by 1 1/2 feet.  I found a couple of smaller pieces that were about one inch square by 3 1/2 feet.  I hooked them to the edge and we were able to have matchbox car races on that.  If the wood hadn't been something we need for shelves I would have probably have nailed the sides down instead of clamping.  Either way the kids didn't really care.  At times I saw cars and trucks bigger then the match box size going down.  The kids thought that was pretty cool.


Out of the checkered fabric I made a checkered flag for the races. 


I also made mini checkered flags to go in the goodie bags.  Instead of $1 store items in the bags I bought a matchbox car for each, a big play-doh, a fruit snack and a handful of starbursts.  I would have taken a picture but I didn't really think about it.

I cut the fabric into squares to put under the cake and on the table for the gifts.  Then I took the remaining fabric and made a checkered flag banner or bunting.  I think it turned out pretty good.  I used a grosgrain ribbon to sew it onto. 


Here is the cute birthday boy showing off the bunting. 

I also bought a pack of cones to mark off the race.  If it hadn't been 100+ heat index the day of the party we would have been able to go outside and do the races.  With it so hot outside we ended up doing the races around my kitchen living room "track".  Since we didn't get a chance to race outside I was glad I had set the Cars movie to watch the final race.  It seemed fitting to end the fun with a "real" race.

Happy 4th Birthday to my dear sweet boy!!


 Photobucket

Saturday, August 6, 2011

Ruffled Notebook Cover Tutorial

Maybe you remember back in  February I made a Ruffled Notebook Cover ?!?!?!  It looked like this.


Oh yeah you say. . . I seem to remember you promising a tutorial . . . Yep, I had more to make and thought I would get to it soon.  Now it is 6 months later and I am getting around to it.  It might look like I was waiting for the notebooks to go on sale, but that would just be me trying to get around the fact that my craft room has been collecting dust for the most part.  Something about a VERY mobile baby and other projects getting in the way.

With all that said I finally finished up the other notebooks I had cut out and so I have no excuse for not getting this posted now.  Here they are in all their beauty!!!


Now for the tutorial.  Drum roll please.  Okay maybe not that much fanfare.  I must put a funny side note on this tutorial - In my haste to finish the one for Liberty earlier this year, I forgot to finish taking pictures and so as you go through the pictures you will notice the fabric changes in most the pictures.  My mistake.  I am kind of spacey most days.
Another side note:  I tend to explain things expecting you to know basic construction techniques.  I am not very detailed, sorry.  If you have questions then email me or leave a comment and I will respond to you.

Materials:
  • Composition notebook (good to buy them now when they are under a $1 at some places - they can be over $3 off school season.)
  • Main Fabric about 1/2 yard
  • Coordinating fabric for ruffle and pocket - 1/4 to 1/3 yard
  • Ribbon about 1 yard
Fabric Cutting:

Main fabric: CUT two of each size
  • 16 1/2 inch by 4 inch (outside top and bottom)
  • 8 inch by 11 inch (inside panel)
Coordinating fabric: CUT one of each size
  • 40 inch by 5 inch (ruffle)
  • 6 inch by 6 inch (pocket)
Ribbon: CUT two of each
  • 12 or 13 inch pieces  for ties
  • 4 inch pieces for "binding"
How To:
Begin by taking ruffle piece and doing two rows of gathering stitches on both sides of the fabric.


Next attach ruffle to one of the main front fabrics, matching edges and then middles.


Then pull the threads to gather the material to the top fabric piece.  Then sew along this edge.  It will look like you are making a skirt for a minute now.


Repeat with the bottom piece of fabric.


Next step is to press the piece so the ruffles look more flat.  I tend to pull the top and bottom pieces a little bit as I press.  I also press where the ruffles meet the top pieces towards the non ruffled piece.   It will make it easier to pull the ruffles better and also makes a place where we can top stitch.


Next topstitch about 1/8 to 1/4 inch from the ruffles.


Now pull out your pocket piece and press about 1/2 inch down on one side.  You should probably finish the edge with serging, zigzag or cut with pinking sheers first.  Once you have pressed it down you can stitch down the top of the pocket.  I ran two stitches along the edge of where I had folded.


Now fold in all the edges about 1/2 inch and press with iron.  Then hold on to this while we get the inside panels ready.


Take the inside panels and on the 11inch side finish the edge then fold over about 1/2 inch, press and stitch.  Repeat for other  piece.


Flip to the right side and pin the pocket on.  I kind of center it top to bottom but put it closer to the sewn edge and then do a double row of stitches like I did on the top.


Here is a close up of what I mean.


Now we are ready to assemble our cover.  Place inside panels with hemmed (sewn) edges in the middle and match sides and top together.  There should be a gap between them.


Cut the ribbons to about 12 or 13 inches. Then pin them in where the seam on the outer edge. Make sure you place the ribbon in the center of the outer side seams. I try and match up the ribbons from the front to back so that they will match when you close the book.

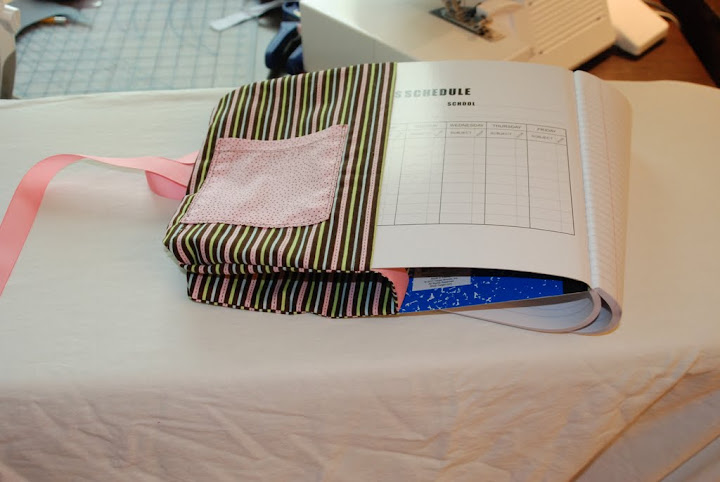
Next take your note book. ( I try and make sure it is the one I am going to use for the end product in case they are a different size. )  I fold the fabric around it and find the center.  Then open up the fabric and place the book on the one side.  I take a pen and trace around the notebook - being generous with the lines.  I carefully put the notebook on the other side and then repeat process.


Here is what I mean.  (A closer view.)


Place the 4 inch piece of ribbon across the gap.  I did this part wrong in this picture.  The next picture shows how they should be.  I put the ribbon across the gap and on the "line" that I have drawn before.  Then you stitch around the entire thing starting and ending near one of the ribbons across the gap.


Now come the hard part.  Before you clip or cut anything it is time to try it on.  This is where I always cringe.  Did I measure it right, did I sew it right.  Make sure you have your friend the seam ripper near by.  It is likely you will need it.

Here is the way I have to put it on.  It always makes me cringe. 


Anyway - once it fits you have one pretty simple step.  I finish my edges by cutting them with the pinking shears.  It makes it really nice when you go around the corners.  You don't have to clip or cut the corners and it gives it a finish that won't unravel.  I am careful to move my ribbon as I cut the fabric underneath.  (see photo where I attached the ribbon above.)


(this has the ribbon wrong, although when I did this I didn't pick it out and it works, just adds a little bit of bulk in the spine area.)

Then you are done, you can go now and write notes in style.  I think these might be fun for a high school or college age kid.  I did give Kirsten one for helping me with cleaning up before Peter's party.  She was a real trooper and I always feel sorry for the kid that doesn't get anything new.


These are fun to make but require a little bit of time to make them look nice.  Always press when possible.  I might suggest not using the stripes. It made it pretty obvious when my center ruffle wasn't exactly straight.  But Kirsten didn't even notice.  I didn't add the pencil/pen holder because I don't like mine and haven't been able to figure out a good method.  I think with Liberty's and others I have just added a looped ribbon piece above where you add the ribbon for the ties.  Just make sure that the ribbon will hold your pencil and is on the back part rather then the front near the pocket.  I have added it after I get all done too, just unpick the area you want it and slip it in and then re sew the area.

I am pretty excited to get these done and now I can work on a new project.  Hope you like it.  Please email me with any questions or comment below.


 Photobucket

LinkWithin

Related Posts with Thumbnails