Tuesday, January 18, 2011

just add a little felt....

I love before and after posts. I love to see the difference between what was and what could be. I wanted to change out my boring old candles so I made these super cute felt covered balls. They were so easy. {a little time consuming, but I've had a lot of time how with a sickie!} I love them. I was going to just use them for Valentines Day, but I might just leave them up all year round. The original idea and tutorial can be found HERE. I used the same idea and made Christmas trees at Christmas time {I guess I forgot to post them! oops.}.


Here are the Christmas trees...{found on my 365 blog here}


Photobucket

Friday, January 14, 2011

The TO DO List

I'm a list maker, always have been, always will be.  (It helps me not be so crazy.)  My husband tolerates it, my kids aren't aware of it yet, and my mom and sisters always tease me about it.  But it is just how I am.  So, since I am wanting to check something off my never ending list that I put up in my last post - I made these.  It was actually nice to get back into the craft room (no matter how messy it still is) and make something.  I have been on a hiatus because of vacation, birthday and Joy School preparation.  I spent a couple hours putting this together the other night and LOVE IT.


I thought of the idea after seeing Liberty's post on her Project 365 blog about her white board at Christmas.  She had all her Christmas TO DO's listed and had checked almost all of them off (or maybe it was all of them.)  Then I saw this POST at eighteen25 and remembered I had a couple of frames that I had picked up at our churches swap we have twice a year.  I decided I didn't need to spend money on a white board when I had these perfectly good glass frames to work with.  With a little fabric (from my stash), Ribbon (from my stash) and my Cricut machine I made these.  This picture is pretty fuzzy - probably the diffuse light I was getting from the hidden sun and the angle I was taking the picture at.  {This room is on the side of my house where you don't get that much sunlight.} 


I used the cartridge Storybook for the lettering and the scrollwork behind it.  The scroll work is number 7 with the Tall/Border option on.  The letters are the standard using the shadow behind them.  I think they turned out pretty cute.  {I'm pretty embarrassed that my list are on there and you can see the number of things I want to do - but that is how I am.}

Here are some better pictures of the frames individually.


Photobucket

Wednesday, January 12, 2011

A New Year - Time for those Resolutions

I have to admit, I do it every year.  Make resolutions.  I tried a couple of years ago to stop doing it, but it didn't work.  I ended up starting my list- just later.   It's like a drug.  It makes you feel all excited and then over time it wears off.  It's just going to happen ever year - I have to get over it. 

So Liberty and I were talking about our goals and we have a similar goal in relation to our creative endeavors, IE, our never ending list of things we want to make.  Our collective goal is to accomplish 2 or 3 unfinished projects before we can actually start a NEW project.  So what do we have on that list????  Do you really want to know???  I don't want to keep you in suspense . . .  BUT here is OUR short list.

To Do:
  •  Finish our Nativities we started before Christmas
(needs to be sanded and fix glue in spots and maybe another coat of mod podge - and Liberty has to print hers out and do the above.)
  • Cut out and Paint wood nativity pieces like this one

  • Put paper and embellishments on our Easter wood letters we bought last year (do this by March)
  • Make one more wood project with 2x4's for Valentine's day
  • And to be truthful - here is the link to my vi.sulize account and to Liberty's for the never ending projects we would like to do - some day (not actually on our list yet - BUT SOON!  We have to complete 2 or 3 of the above)
But to be fair, here is the short list of what I want to do and a picture of the new boards I am going to make all pretty for the to do list in my craft room.  (I was just testing out how they worked before I did everything and didn't love how the pens wrote on them - or something like that.)


Amy's list in no particular order:
  • To Do list white boards (see above)
  • Diaper bag
  • Binkie clip
  • Print project 365 pics from end of 2010 and journaling from both 2009 and 2010
  • Make window covering for Study
  • Hem and put up Family room curtains
  • Peter's baby book
  • Advent calendar wall hanging
  • Make birthday and thank you cards
  • and on and on and on  ( I have more but I'm a bit embarrassed to admit how many things are on my want to do list.  Some have been on there a long time.)
Photobucket

Thursday, December 30, 2010

"Santa" wrapping {note for next year}

Yes, I know that Christmas is over. I CAN'T WAIT to get it all down and cleaned up! {that's the project for tomorrow}. I wanted to share an idea for "Santa" wrapping. Santa always wraps our presents, and he likes to use all the same paper! {The Santa Paper}. My son is 11 and is "pretty sure" that Santa is not real. {can you believe it?}. I always like to just label the gifts and usually just put a little initial on the bottom of the gift...but this year, I decided I would use my sticker letters to label each persons gifts. I love how it turned out...and there was no question what belonged to who!


Ever since I started digital scraping, I have to come up with ideas of how to use my ENTIRE room of Scrapbook Supplies.

Photobucket

Monday, December 20, 2010

And the Stockings were Hung . . .

For those with out a fireplace mantel to put your stockings on, we have the perfect solution.  A wooden sign with the cute saying . . . "the stockings were hung . . . "  This was another project from our craft group last year.  We did them in a variety of ways.

Like this one with stars above the nails. . .


Or you could add names . . .


Or this one with stars on the ends and a 3 foot board . . .


 We had a lot of fun painting, sticking vinyl on our boards, sanding and banging those nails in.  Hope they don't mind I posted some pictures of them hard at work.  The boards were the same size as our Family Home Evening boards that we have made in the past and so they could hang them in the same place during December.


Photobucket Photobucket

Sunday, December 19, 2010

Creche Ornament Tutorial

Creche Ornament Tutorial

This is a very simple ornament to make.  It does require a glue gun and some paint brushes in addition to the items listed in THIS POST

I hope I took pictures of all the steps.

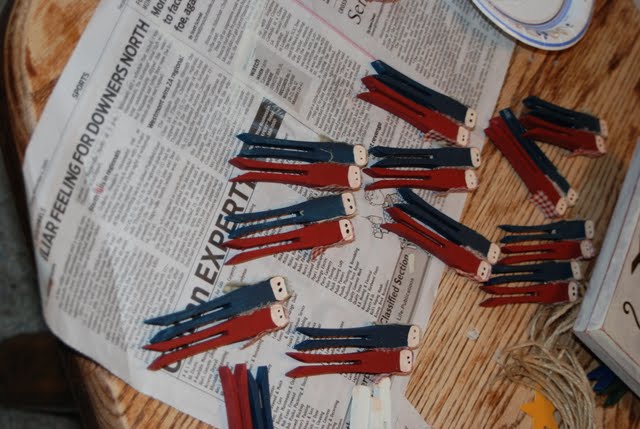
First paint half of the larger clothes pins one color (like blue or green) and the other half a second color (like red) Then paint all the small ones white.  Cover the entire clothes pin with the paint.

White small clothes pins
Blue Large clothes pins
Then paint the stars yellow.


Next paint just the front part of the clothes pin on the two larger ones with a peachy skin color. (You do not need to paint the sides since they will be covered in fabric.)
Next paint the entire top (head) of the white small clothes pins.


With black paint and the end of something small - paint brush or pin - make eyes.  Just two dots per head.  Then add a touch of blush on the cheeks with a Q-tip or something like that.


 Then add fabric to the Mary and Joseph, to cover their heads.  (Sorry this picture is too small.)  Just a thin 1/4 to 1/2 inch strip that is about 2 to 3 inches long.  Do each head a separate color.  I did red for Mary and tan for Joseph - because that is what I had on hand.  I could be anything you have on hand that looks a little rustic.

Next glue Mary and Joseph together with hot glue, making sure Mary is just a little lower then Joseph.
Secure the star with hot glue


Then glue baby Jesus on top of the star.


 Secure a piece of twine on the back with hot glue, making sure you put your tag on first (Not shown in this picture.)


 Then enjoy your hard work and deliver to friends with your Christmas cards or how ever you want to do it.

Edited to add: Here is a link to the tags.  Unto Us Tags


Saturday, December 18, 2010

More Neighbor or Friend gifts

Some of these were made last year before we had our blog, but I had taken pictures because I was thinking about having a blog at the time (our one year is coming up soon - mmm, maybe we need to do something about our one year mark.  I will have to think about that. )

But anyway here are a couple ideas with lists for what you need to make them.  I will see if I can get that tutorial up for the Creche ornaments soon.

Enjoy!!

Believe Bells Ornament
(Not original to me - I copied Liberty from last year)

Items needed:
Bells (bought after Christmas for 75 or 80% off)
12 to 13 inches of Ribbon (50% off at Micheals)
Twine (purchased for an earlier project)
Tag (made in photoshop - says "The bell still rings for those who truly Believe.  The Andersons 2010")

Edited to add a link to the tag (without my name and year on it.)  It is a jpg file, I guess if you have Photoshop you could add your own name or you can just print it on cardstock and write your own name.  Here is the link.  Enjoy!!


Nativity/Creche Ornaments:
(Tutorial to come)
Large wood clothes pins and small clothes pins (found in the wood section at JoAnn's, Micheals or Hobby Lobby)
Wooden Stars (Same place)
Small pieces of checkered cloth (for head coverings)
Twine for hanger
Tag that says "For Unto us a child is Born"

 2x4 Wood Peace, Love and Joy Blocks

2x4 cut at 4, 5 and 6 inches
Paint to match
Scrapbook paper
Vinyl cut on Cricut (Liberty can tell you which cartridge, if she remembers)


Photobucket

Friday, December 17, 2010

Beauty for less....

A few dollar store ornaments, a vase from under the kitchen sink and some picks from Hobby Lobby {at 50% off}. A beautiful "mantle" aka top of the entertainment center.


Photobucket

Wednesday, December 15, 2010

Neighbor Gifts

Here are two ideas {and printables so you can make your own} Merry Christmas from CraftsreDesigned. We love being able to share our craft ideas with you.

Give Soap {I got mine at Bath and Body on sale}


Tag says, "Wishing you a holiday season full of peace, joy and SOAP"

HERE is the printable for you, it's an 8 1/2 x 11 page, print on cardstock, cut out and tie to soap.  If that link doesn't work try HERE.

OR

Give Wrapping Paper {I got mine at Joann's at 60% off}


Tag says "We hope you are getting "wrapped up" in the spirit of the season."

The Printable is HERE.  Or if that link does not work try HERE.

Merry Christmas.


Photobucket

Just add wood....

Amy and I got together on the weekend after Thanksgiving and made a few snowmen and trees. They turned out super cute and were very easy to make. We followed the directions HERE and HERE with just a few variations.


Our tree blocks are 3 1/2", 4 1/2", 5 1/2" and 6 1/2". the stem in just a scrap. and the star is from a template. Super easy.


The snowman blocks are 2-3", 4" and 5". The hat is a scrap that is 4" and a small piece on top that is 2 1/2" x 2". We just used some scrap board, pine or poplar would work. We used fabric to tie around his neck and scrapbook paper on the hat. I also added a heart button to the hat and you could add them for buttons down the front.

Happy Crafting!!!

Photobucket

LinkWithin

Related Posts with Thumbnails