Wednesday, March 23, 2011

WINNER!!

Sorry I'm a few days late...I haven't been feeling well.

The winner is:


Congratulations to The Knapps!!! I will send you an email with your code right away!!!


Photobucket

Monday, March 7, 2011

Are you Lucky?

I don't really decorate for St. Patricks....we usually go straight from Valentines to Spring and Easter....but Easter is still a long ways away so I thought I would make some LUCKY blocks for St. Patricks Day.


and then I found this cute Subway Art at eighteen25 and put it in my frame....all done.


Now i can say I "changed" my decorations!


Photobucket

Friday, February 25, 2011

A late Valentine's entry

You would think that Valentine's is over, but in my book you can "celebrate" it or keep decorations up for it until March 1st.  AND SO, I thought I would post this cute picture of my baby in her Valentine's skirt.  Of course this could be done with any material for any type of skirt.


I found the idea on Homemade by Jill that was featured on Kojo Designs blog.  Only modification I did was to gather the material before I added it to the knit fabric waistband.  Okay and I used a cotton fabric instead of the denim and did a rolled hem on the bottom of it.  It turned out pretty cute and would have only taken me less then an hour if I didn't mess up on the waist band and make it too tight at first and then waaaaay to big the second time.  (It would have helped if the model wouldn't have been asleep when I was making it - but that is what that seam ripper is for.  It has to get it's work in sometime.)

I'm also blaming my late posting on a slew of computer problems we have had the last couple of weeks, along with a job change for Dave.  So there are my excuses take it or leave it.


Photobucket

Friday, February 18, 2011

Ruffled Notebook Cover

I decided I NEEDED a notebook covered in cute fabric to keep all my crazy lists.  Plus they looked so cool online that I thought I might try it.  I didn't follow anyones blog on how to do the notebook cover.  I just decided I could measure like all the other tutorials out there on how to make a notebook or book cover.  Plus I think this is a project I have done before back in the day.  Anyway.  I made the stripe one with the cute polka dot out of material from my stash.  I thought I was pretty cool with the ruffle and the ribbon to close it and even a pen holder.  BUT then I saw this post on making a ruffled table runner and I fell in LOVE!!  I mean really that couldn't be that hard and I really thought I might have to try it again.  And

WAL-LA!  One of my friends had a birthday and I had the perfect opportunity to try out my technique and I LOVE the result.  Don't you think it is cute?


Now to make another one - now that I've worked out all the kinks.  I think Liberty would let me do one for her if I asked real nice.  If she gives me some material I'll make one to match her fancy new purse, and maybe even do a tutorial.  Really it doesn't take all that long, under an hour with minimal interruptions.
Photobucket

Monday, February 14, 2011

Valentine's Day fun


Happy Valentine's day! I saw this idea on the Becky Higgins Blog awhile back and decided I wanted to do it.  Especially since I have a baby with cute feet.    I had to use my Picasa program to put it together instead of Photoshop since my computer is on the fritz.  The paper in the background is from Persnickity Prints called vintage love.  It turned out sooo cute.  Here is another way I put it together.

 Pretty fun to play with.  I like it.

Here are a couple of Valentine's ideas that I have wanted to do with Liberty, but between the two of us we have been sick for over a month (different things and times that overlap.)  So we  (my kids and I) worked on these today.  I think they turned out pretty cute.


This wood block idea was on Under my Umbrella, it was pretty easy and we wanted to try it out.  Easy and Fun.  Kirsten was pretty impressed.


This idea started with this post from Brown Paper Packages but I took it to a different level.  I really love conversation hearts.  And so this was the perfect blend of the project I saw and the idea in my head.  I wanted mine to look like true conversation hearts.  Now I wish I had made these earlier this month, but oh well.  Life is just like that some days.  I found the paper at JoAnn's it is a solid color with glitter on it.

Photobucket

Sunday, February 13, 2011

Subway Art.....Personalized

I made some cute personalized subway art for Valentines Day. I LOVE how it turned out. I am planning on changing the colors for each holiday. I made individual ones for my mom and mother-in-law. You can see them HERE.


Photobucket

Monday, January 31, 2011

Baby, Binkies and Blocks


Okay now isn't she cute?  She is modelling a valentine's day binkie clip that I can now cross off my TO DO list.  I didn't just make one.  You know they get dirty and also you can never have enough binkie's around.  So I made 4.


Two have the same pattern on one side but a different matching pattern on the other.  I found the tutorial at Sew, Mama, Sew!  My only change was I used a snap instead of the Velcro.  I think it will stay together better, especially since Esther loves to pull it out occasionally.


I also test ran a pattern for baby blocks.  I had some left over material that seemed perfect for baby blocks.  Full of texture and different colors.  Don't know if she likes them yet - the jury is still out.  (Although Kirsten and Peter can be found playing with them.)  There is a pretty good tutorial on Flickr by London mommy.  I didn't really change anything on this except I made one with 4 inch squares and one with 5 inch.  I'm not sure if it is my stuffing job or just the stuffing that makes them so round looking.  I know that the black fabric is a bit stretchy.  Oh, well my kids will play with them and probably never notice.
Photobucket

Monday, January 24, 2011

Nursing Cover

I didn't re-design this. I followed a GREAT tutorial. LOVE how easy it was and how cute it turned out. You can find the tutorial HERE. I followed her directions exactly.


Photobucket

Tuesday, January 18, 2011

just add a little felt....

I love before and after posts. I love to see the difference between what was and what could be. I wanted to change out my boring old candles so I made these super cute felt covered balls. They were so easy. {a little time consuming, but I've had a lot of time how with a sickie!} I love them. I was going to just use them for Valentines Day, but I might just leave them up all year round. The original idea and tutorial can be found HERE. I used the same idea and made Christmas trees at Christmas time {I guess I forgot to post them! oops.}.


Here are the Christmas trees...{found on my 365 blog here}


Photobucket

Friday, January 14, 2011

The TO DO List

I'm a list maker, always have been, always will be.  (It helps me not be so crazy.)  My husband tolerates it, my kids aren't aware of it yet, and my mom and sisters always tease me about it.  But it is just how I am.  So, since I am wanting to check something off my never ending list that I put up in my last post - I made these.  It was actually nice to get back into the craft room (no matter how messy it still is) and make something.  I have been on a hiatus because of vacation, birthday and Joy School preparation.  I spent a couple hours putting this together the other night and LOVE IT.


I thought of the idea after seeing Liberty's post on her Project 365 blog about her white board at Christmas.  She had all her Christmas TO DO's listed and had checked almost all of them off (or maybe it was all of them.)  Then I saw this POST at eighteen25 and remembered I had a couple of frames that I had picked up at our churches swap we have twice a year.  I decided I didn't need to spend money on a white board when I had these perfectly good glass frames to work with.  With a little fabric (from my stash), Ribbon (from my stash) and my Cricut machine I made these.  This picture is pretty fuzzy - probably the diffuse light I was getting from the hidden sun and the angle I was taking the picture at.  {This room is on the side of my house where you don't get that much sunlight.} 


I used the cartridge Storybook for the lettering and the scrollwork behind it.  The scroll work is number 7 with the Tall/Border option on.  The letters are the standard using the shadow behind them.  I think they turned out pretty cute.  {I'm pretty embarrassed that my list are on there and you can see the number of things I want to do - but that is how I am.}

Here are some better pictures of the frames individually.


Photobucket

Wednesday, January 12, 2011

A New Year - Time for those Resolutions

I have to admit, I do it every year.  Make resolutions.  I tried a couple of years ago to stop doing it, but it didn't work.  I ended up starting my list- just later.   It's like a drug.  It makes you feel all excited and then over time it wears off.  It's just going to happen ever year - I have to get over it. 

So Liberty and I were talking about our goals and we have a similar goal in relation to our creative endeavors, IE, our never ending list of things we want to make.  Our collective goal is to accomplish 2 or 3 unfinished projects before we can actually start a NEW project.  So what do we have on that list????  Do you really want to know???  I don't want to keep you in suspense . . .  BUT here is OUR short list.

To Do:
  •  Finish our Nativities we started before Christmas
(needs to be sanded and fix glue in spots and maybe another coat of mod podge - and Liberty has to print hers out and do the above.)
  • Cut out and Paint wood nativity pieces like this one

  • Put paper and embellishments on our Easter wood letters we bought last year (do this by March)
  • Make one more wood project with 2x4's for Valentine's day
  • And to be truthful - here is the link to my vi.sulize account and to Liberty's for the never ending projects we would like to do - some day (not actually on our list yet - BUT SOON!  We have to complete 2 or 3 of the above)
But to be fair, here is the short list of what I want to do and a picture of the new boards I am going to make all pretty for the to do list in my craft room.  (I was just testing out how they worked before I did everything and didn't love how the pens wrote on them - or something like that.)


Amy's list in no particular order:
  • To Do list white boards (see above)
  • Diaper bag
  • Binkie clip
  • Print project 365 pics from end of 2010 and journaling from both 2009 and 2010
  • Make window covering for Study
  • Hem and put up Family room curtains
  • Peter's baby book
  • Advent calendar wall hanging
  • Make birthday and thank you cards
  • and on and on and on  ( I have more but I'm a bit embarrassed to admit how many things are on my want to do list.  Some have been on there a long time.)
Photobucket

Thursday, December 30, 2010

"Santa" wrapping {note for next year}

Yes, I know that Christmas is over. I CAN'T WAIT to get it all down and cleaned up! {that's the project for tomorrow}. I wanted to share an idea for "Santa" wrapping. Santa always wraps our presents, and he likes to use all the same paper! {The Santa Paper}. My son is 11 and is "pretty sure" that Santa is not real. {can you believe it?}. I always like to just label the gifts and usually just put a little initial on the bottom of the gift...but this year, I decided I would use my sticker letters to label each persons gifts. I love how it turned out...and there was no question what belonged to who!


Ever since I started digital scraping, I have to come up with ideas of how to use my ENTIRE room of Scrapbook Supplies.

Photobucket

Monday, December 20, 2010

And the Stockings were Hung . . .

For those with out a fireplace mantel to put your stockings on, we have the perfect solution.  A wooden sign with the cute saying . . . "the stockings were hung . . . "  This was another project from our craft group last year.  We did them in a variety of ways.

Like this one with stars above the nails. . .


Or you could add names . . .


Or this one with stars on the ends and a 3 foot board . . .


 We had a lot of fun painting, sticking vinyl on our boards, sanding and banging those nails in.  Hope they don't mind I posted some pictures of them hard at work.  The boards were the same size as our Family Home Evening boards that we have made in the past and so they could hang them in the same place during December.


Photobucket Photobucket

Sunday, December 19, 2010

Creche Ornament Tutorial

Creche Ornament Tutorial

This is a very simple ornament to make.  It does require a glue gun and some paint brushes in addition to the items listed in THIS POST

I hope I took pictures of all the steps.

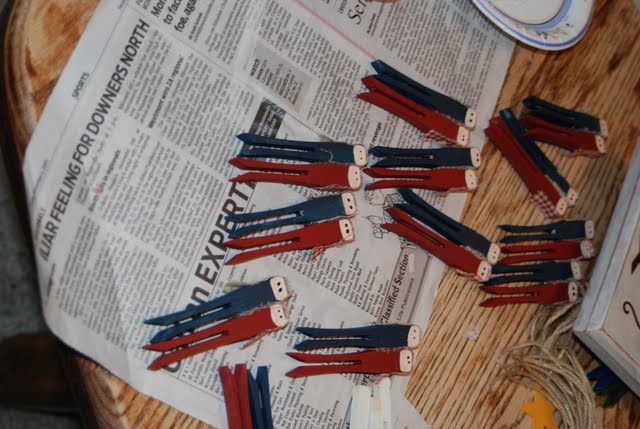
First paint half of the larger clothes pins one color (like blue or green) and the other half a second color (like red) Then paint all the small ones white.  Cover the entire clothes pin with the paint.

White small clothes pins
Blue Large clothes pins
Then paint the stars yellow.


Next paint just the front part of the clothes pin on the two larger ones with a peachy skin color. (You do not need to paint the sides since they will be covered in fabric.)
Next paint the entire top (head) of the white small clothes pins.


With black paint and the end of something small - paint brush or pin - make eyes.  Just two dots per head.  Then add a touch of blush on the cheeks with a Q-tip or something like that.


 Then add fabric to the Mary and Joseph, to cover their heads.  (Sorry this picture is too small.)  Just a thin 1/4 to 1/2 inch strip that is about 2 to 3 inches long.  Do each head a separate color.  I did red for Mary and tan for Joseph - because that is what I had on hand.  I could be anything you have on hand that looks a little rustic.

Next glue Mary and Joseph together with hot glue, making sure Mary is just a little lower then Joseph.
Secure the star with hot glue


Then glue baby Jesus on top of the star.


 Secure a piece of twine on the back with hot glue, making sure you put your tag on first (Not shown in this picture.)


 Then enjoy your hard work and deliver to friends with your Christmas cards or how ever you want to do it.

Edited to add: Here is a link to the tags.  Unto Us Tags


LinkWithin

Related Posts with Thumbnails